
Shhhh!!!!! It's a secret to everybody.
That may have been true before, but now with www.Retro-Grades.com on your side, you have a friend! If there is a game that has given you trouble, be sure to scan through our listing below. And rest assured — we research and test every code before we post them.
Click on the categories below the SECRETS tab in the Navigation panel on the ← to find some of the secrets we have compiled. All game entries are listed alphabetically. And don't forget to visit www.Retro-Grades.com often for new secrets being released all of the time!
|
BONUS POINTS
|
||||||||||||||||||||||||||||||||||||||||||||||||||||||||||||||||||||||||||||||||||||||||||||||||||||||||||||||||||||||
|
BONUS QUESTS
|
||||||||||||||||||||||||||||||||||||||||||||||||||||||||||||||||||||||||||||||||||||||||||||||||||||||||||||||||||||||
|
CONTINUE |
||||||||||||||||||||||||||||||||||||||||||||||||||||||||||||||||||||||||||||||||||||||||||||||||||||||||||||||||||||||
|
EXPLOITABLE GLITCHES
|
||||||||||||||||||||||||||||||||||||||||||||||||||||||||||||||||||||||||||||||||||||||||||||||||||||||||||||||||||||||
|
EXTRA 1UPS
|
||||||||||||||||||||||||||||||||||||||||||||||||||||||||||||||||||||||||||||||||||||||||||||||||||||||||||||||||||||||
|
HELPFUL TIPS
Near the game's end location (at the Theater entrance), Silvia can deploy the strategy to defeat the two, powerful, vampire-like foes that fire streams of bats guarding either side of the stairway leading to the entrance. After defeating one, Silvia can go down to the Save Point (Office) in the Main Hall below to safely save her progress and restore her life (if the easiest setting of Casual is being used). (If not, it still is crucial to save your game here.) Then, she can defeat the remaining enemy of the set before entering the Theater.
|
 Evil Tonight
|
|||||||||||||||||||||||||||||||||||||||||||||||||||||||||||||||||||||||||||||||||||||||||||||||||||||||||||||||||||||
Evil Tonight
|


 Puzzle #1 (Students' Residence Key)
|

 After Silvia examines the praying, angel statue, she will notice a square grid carved into the bricked-over ground behind her. A set of stone pedestals with geometric shapes atop each one can slide within its grooves. At certain points, there are shapes etched upon the ground. Can you figure out what to do next? If not... Silvia must manipulate and move the six, stone, sculpted shapes into each corresponding shape on the ground.  Once every shape is matched and set in place, Silvia will receive the Students' Residence Key from the angel statue.  |
 Puzzle #2 (Key Of Coins)
|

A small, blue chest with a set of six numbers can be found in the Dressing Room. This room is located in the second, main building (the large one south of the Students' Residence), down the hallway of the bottom-right door within. 
 
 
 The Dressing Room is a tough room to encounter early on. Aggressive maids with knives guard the way. Silvia searches the spacious area to find six scraps of notebook pages with numbers scrawled across them.  Each set of numbers on the torn notebook pages has one, correct digit. Take note of the position of each number on each sheet. Can you figure out which number is important per card? If not... On each card, one of the six numbers is in BOLD (or it may be the lightest digit—the only one, not bold or darkened, depending upon the randomness of the puzzle that you receive during your gameplay). Note the position of the bold number (or the single, lighter text, mixed in with all darker digits) and place that number in the corresponding place in the combination on the chest. For example, if a card reads 123456, the third position in the combination will hold the number 3... and so forth, for each of the other five cards.  |
 Puzzle #3 (Garden Key)
|
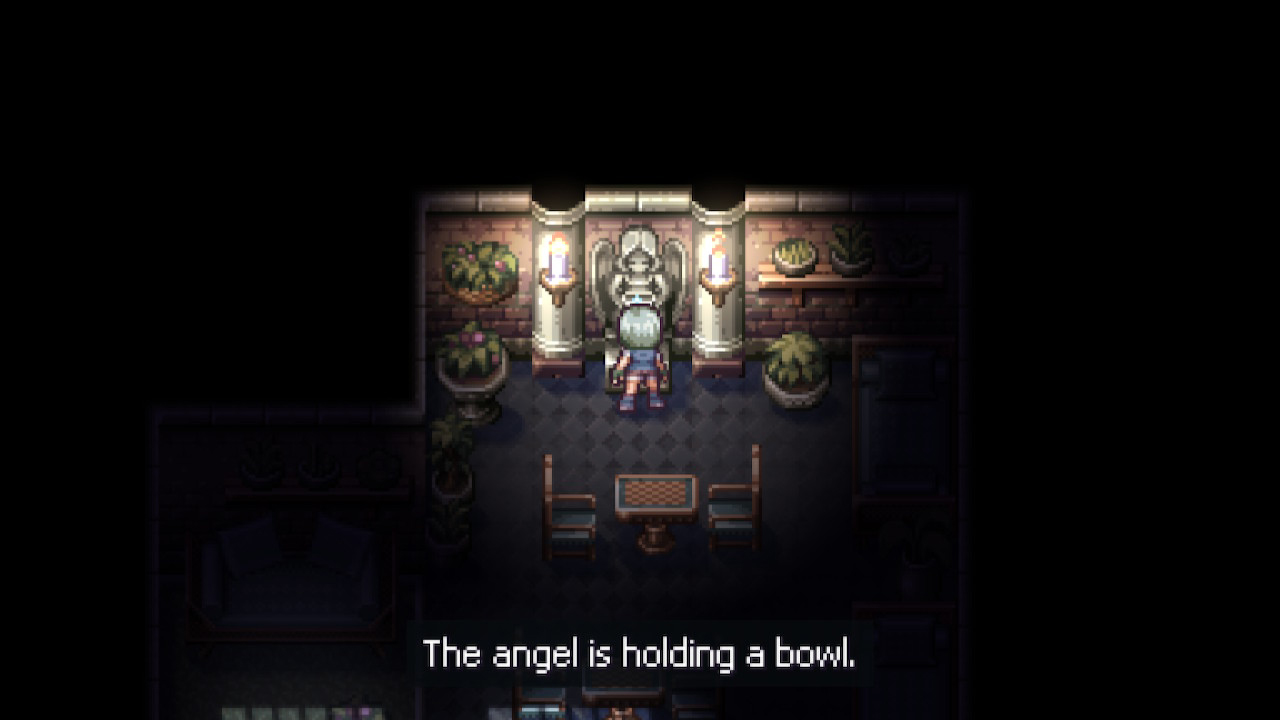

Inside the building that contains the Game Room, there is a statue of an angel holding a bowl. Beneath it, there is a pedestal. Engraved upon that pedestal are images of ballerinas.  Immediately outside the building, there are five statues of dancers in various poses. Carefully take note of the position of each ballerina pose. Can you figure out which order the various engraved, ballerina poses go on the pedestal inside the building? If not... Pay close attention to each of the ballerina statues outside. (Be sure to look at them closely when the lightning strikes because it illuminates them better.) On each platform or pedestal that all five, posed ballerinas stand, there is a random number of squares ■ (from one to five) that can be seen etched in the stone. 
Note the position of the dancer and the number of squares. Inside the building at the puzzle, place the corresponding dance pose in the right order from one to five to solve the riddle.  |
 Puzzle #4 (Key Of Cups)
|


Inside the room that Dino runs to after Silvia defeats the Maid who is threatening him (above the Reception Room or room with the Student Registration book), there is a floor with a geometric pattern of tiles. In front of this floor, there is a board with a missing, ceramic piece that is mounted on the wall. (The floor will be behind Silvia when she is facing the board.)  Silvia will need the Squared Piece that she found earlier in the room on the second floor of the second, main building across from the busted window where the Grappling Hook is used.  If she has the piece, insert it into the board. Can you figure out the next steps? If not... Pay close attention to the geometric layout of the floor pattern behind Silvia. Memorize it and rotate the pieces in the board, until they have the same design as the floor. 

 |
 Puzzle #5 (Fuses)
|

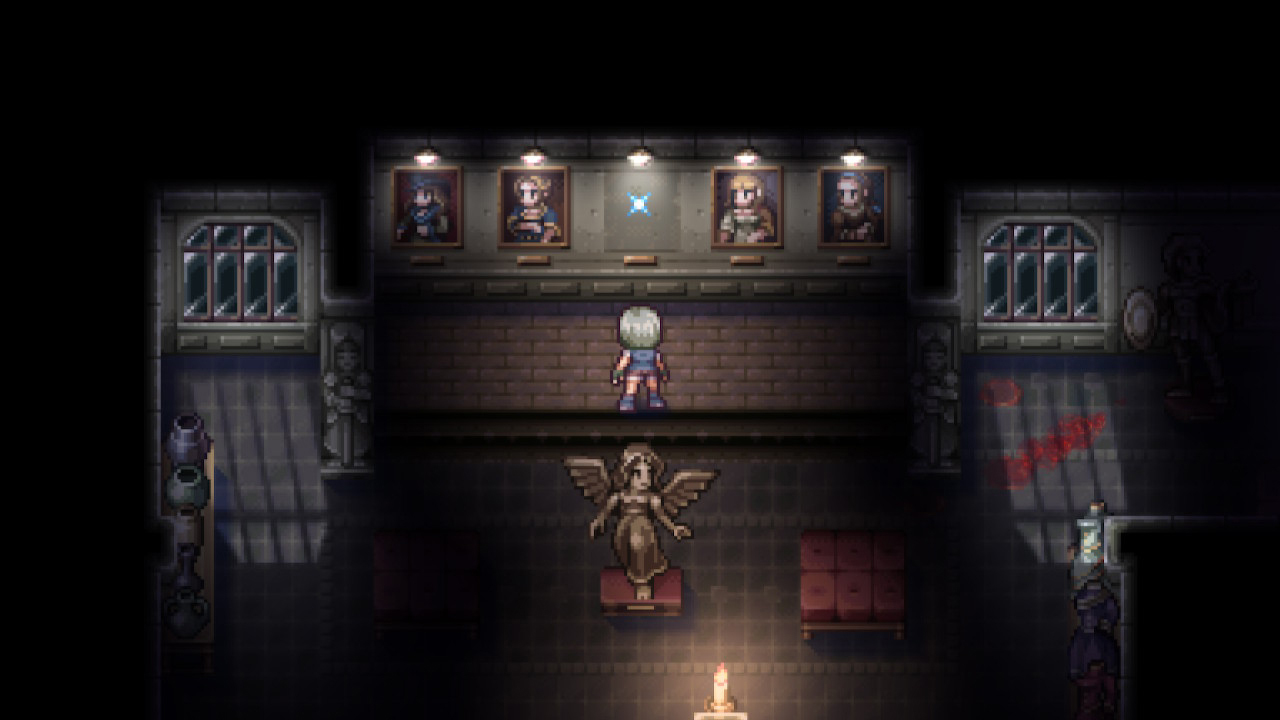
In the second, main building, there is a room of portraits in the corridor that leads from the upstairs right door from the main lobby with the large ballerina statue. Inside this gallery, there is a "beautiful angel carved in white marble". A quote, "It all began in youth", rests on a pedestal beneath the statue. On a raised stage behind it, there are four portraits hanging on the wall with a fifth empty space reserved for a painting, resting in the middle position.  Silvia will need the Artist Portrait that she found earlier in the second, main building in the room where she found Pepe crying. (It was accessed by placing the Unicorn Head on the headless horse statue in the room of extinguished torches, hidden behind the sliding shelf in a room found in the lower-right corridor of the second, main building.)  When Silvia examines the portraits on the wall, she will remark upon the ages of each performer. If she has the Artist Portrait, place it into the missing painting space.   A set of buttons appears and activates beneath each picture. Can you figure out the next steps? If not... Look closely at the dates or life span beneath each portrait. Determine the age of each performer by subtracting the birth year from the death year. Take note of each age. Use the buttons below each picture to position each portrait from youngest to oldest from left to right. 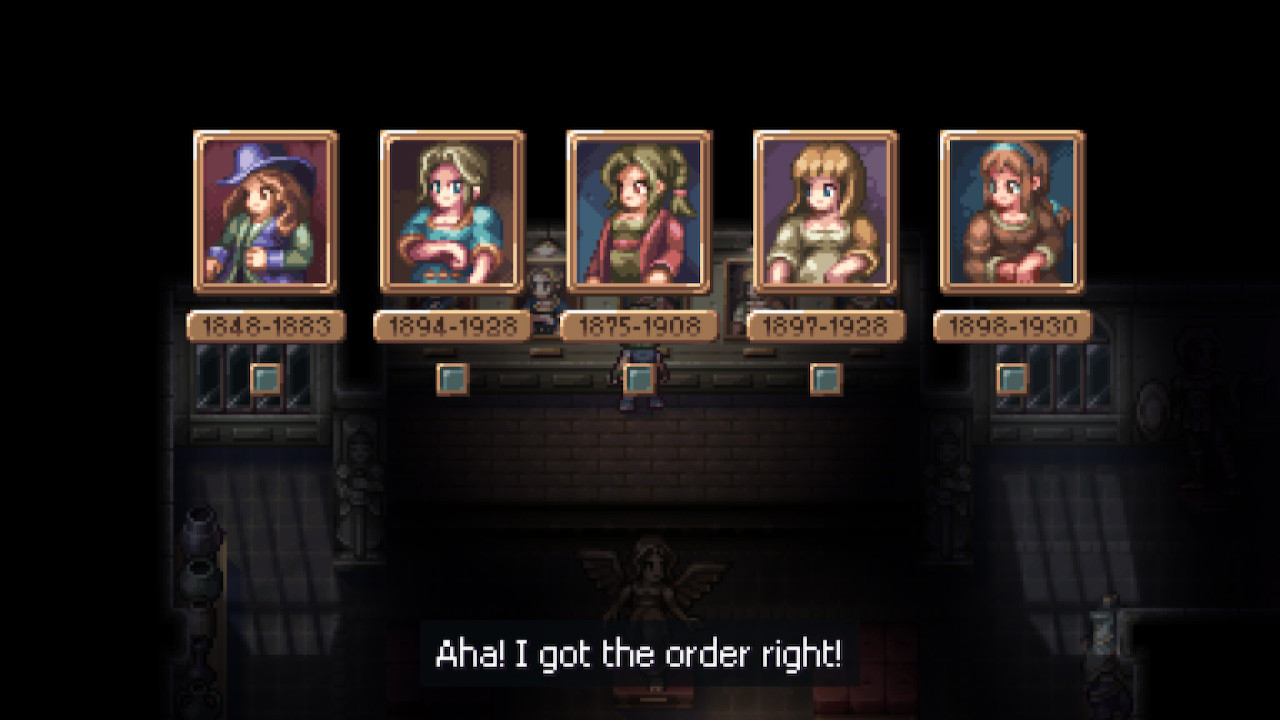
When done correctly, a mechanism will go off in the room. Silvia must walk over to the statue at the far right of the large room and retrieve the Fuses from the statue's open hand.  |
Puzzle #6 (Access to New Area)
|

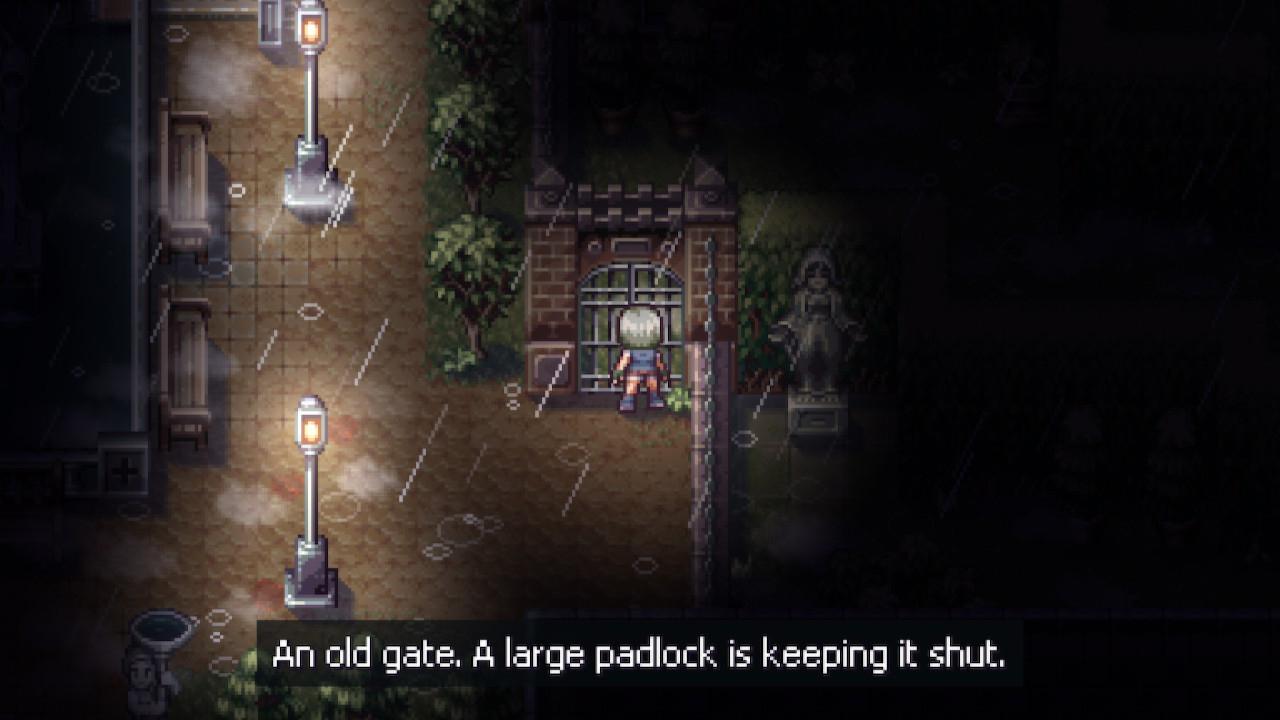 Silvia will need to enter the Garden, but there is a locked gate.  If she has the Garden Key, she can gain entrance. (This is a reminder that Puzzle #3—the one that involves the Game Room and dancing, ballerina, statue poses—rewards the Garden Key.)   Once inside, she finds out that the garden is a maze guarded by the game's toughest enemy, aside from Violetta. This large, plant-like creature aggressively stampedes Silvia with powerful charges, then quickly disappears only to re-emerge at different spots within the gated territory. Once he is dispatched, there are still several sprout-like foes and rapidly growing plant-like tentacles trying to block Silvia's advance. Proceed with caution.   While working her way through the hazards of the maze, Silvia will find four, robed, female statues with their palms extended. A sparkle of light will shine on each, beckoning Silvia's attention. Can you figure out what to do next? If not... Each statue has to be lit, but there is one caveat: all four have to be lit up in a specific order that is randomized per game file. Use trial-and-error and approach and light each statue until all four are aglow. (If you light the statues out of order, each one will extinguish their flames and you'll have to try again in a different order until you succeed in finding the correct order.) When all four light up, a fence will lower. This will unlock your path forward to a new area to explore. 
|
/Evil_Tonight-Fire-Extinguisher.jpg) Puzzle #7 (Fire Extinguisher (Refilled))
|
/Evil_Tonight-puzzle7-0.jpg)
/Evil_Tonight-puzzle7-1.jpg) /Evil_Tonight-puzzle7-2.jpg) The Electrical Room is located in the northern reaches of the academy. After making your way through the Garden Maze, this room lies in the Back Alley, just through the top doors leading out of the Japanese-themed area. Inside the Electrical Room, Silvia will find a deactivated power generator. /Evil_Tonight-puzzle7-3.jpg)
The Fuses that Silvia retrieved earlier will be handy for the power generator. /Evil_Tonight-puzzle7-4.jpg) Now, with the Fuses connected, the power generator still isn't working. Can you figure out the next steps? If not... Look closely at the panel. At the far right of each row, there is a number in red. At the bottom of each column, there is a number in red. The key here is to reposition the fuses until each column and row ends with a green number. This can take a bit of trial-and-error, but when successful, the generator will power up the electrical system. /Evil_Tonight-puzzle7-5.jpg)
Now, Silvia has to exit the Electrical Room (Be careful to avoid the electrified, grated floor panels!), return to the Alley and travel right to the dead-end. Once there, go down to enter the only door there. /Evil_Tonight-puzzle7-6.jpg)
Once inside this Boiler Room, Silvia will have to turn valves to stop various jets of hot steam from blocking her path. She needs to work her way down to the left-bottom of the large, maze-like room. Along the way, there will be a few powerful foes that spew fire. Either try to evade them or defeat them. Once she reaches her target, she'll find a machine that will recharge her Empty Fire Extinguisher. Refill it! /Evil_Tonight-puzzle7-7-Refilled.jpg)
(Note: The Fire Extinguisher (Empty) was originally found in the Infirmary Ward of the Students' Residence. To access that room, the Key Of Swords was needed.) |
 Puzzle #8 (Huge Gem)
|

 Inside of a room with many reels of film (found in the farthest right, top set of double-doors at the end of the Back Alley), Silvia will find a locked drawer.  Silvia will need the Small Key that she found earlier in the Locker Room or storage room with several lockers. To access this Locker Storage Room, Silvia needs the Key Of Clubs. The Locker Room is located in the second, main building in the corridor that leads from the bottom right door from the main lobby with the large ballerina statue. Once inside the room, the Small Key will be in the rear, right corner inside the card catalog drawers.  Back to the Film Room, if she has the Small Key, it will unlock the drawer. Inside is the VHS Tape.  Now, Silvia will need to find the Video-Editing Room (located in the second, main building in the top-right hallway), defeat the enemies there and then look for the Video Player. Can you figure out the next steps? If not... Use the VHS Tape on the Video Player. Silvia will see a jumbled set of letters flashing randomly on screen.  She will carefully record four groups of repeating sets of letters into her Notebook.  Now, Silvia will need to find the Sewing Room. It is located in the second, main building (again), but this time, in the corridor that leads from the upstairs or top left door from the main lobby with the large ballerina statue. The Key Of Clubs will unlock the door. Once inside, Silvia will find the ornamental chest of bronze and brass, resting on a countertop on the left side of the room.  Using her notes from the viewing of the VHS Tape, Silvia can enter each of the four-letter rows she recorded, until she finds the correct combination that will open the chest. As a result, she will receive the Huge Gem. 

|
 Puzzle #9 (Musical Score)
|

  Inside the Large Classroom (located in the second, main building in the bottom left hallway from the main lobby with the large ballerina statue... the Key Of Clubs unlocks its door), Silvia will find a calendar on the wall. Upon closer inspection, she will see a number of circled dates. 
Silvia opens her Notebook and copies the calendar exactly as it is seen, circling all of the same dates.  Now, with the calendar copied inside her Notebook, she visits the Teacher's Office. (The Teacher's Office is in the same main, branching corridor as the Classroom and it, also, takes the Key Of Clubs.) A glimmer of light sparkles over a large, stuffed bear. Can you figure out the next steps? If not... Look closely at the bear. Silvia will notice a large hole within its mouth. Could this hole hold something? 
Silvia can search through her inventory and use the Huge Gem on the bear. It will trigger the gears within the stuffed figure to activate, causing it to move to the side, revealing an electronic safe.  
Notice that there is a column of seven, red lights running down the right side of the safe. Now, check Silvia's Notebook, carefully examining the calendar entry she recorded recently. Notice that there are seven, circled dates—one under each of the seven days. (The initials represent the days of the week in Italian.) Find the circled date in the first column ("L" for Lunedì or Monday in English) and carefully enter that number into the safe's number pad, then press the checkmark ("✓"). If done correctly, the top light on the safe will light up green. Next, move over to the second column on the calendar ("M" for Martedì, or Tuesday), enter that circled number/date into the safe, tick the checkmark ✔, check to verify that the second light turns green, then repeat until all seven, correct numbers are entered into the safe. Silvia will receive the Musical Score. 
 |
 Puzzle #10 (Cable)
|

 The Infirmary Ward is the area in the Students' Residence that is reserved for medical care of the ill, injured and sick in the academy. (Remember: To access it, Silvia needed the Key Of Swords.) Inside the Infirmary, there is one door that is nailed over with wooden planks. 
The Axe that Silvia retrieved earlier (from the end of the Ventilation maze area, entered using the Screwdriver on the vent inside the Messy Bedroom in the Students' Residence) will be useful for the boarded-up door.  Beyond the formerly blocked door, there is a room that contains a sealed, little, porcelain box. Can you figure out the next steps? If not... Look closely at the porcelain box. There is a slider-like slit that runs across the front that has a number of tick marks that looks similar to a ruler. Notice that there is a large, tan arrow that points to one of the marks near the end. Below the slider, there is a row of nine buttons. For every button you click, a red line moves down the slider a certain number of ticks. The trick to solving this puzzle is to click the right combination of buttons to perfectly align the red line with the spot that the tan arrow points. This may take some trial-and-error. Once it is performed correctly, the box will open and Silvia will receive a Cable. 

 |
 Puzzle #11 (Ornamental Key)
|

  Inside the Projector Room, Silvia will find a projector that she can use. (To reach this room, Silvia needs to go to the bottom left door from the main hall with the large, ballerina statue in the second, main building. After entering that door, she needs to go up, left, up again and all the way to the right, where a set of double-doors awaits her at the top of the corridor at the dead end there.)   Silvia will have to use three Slides that are hidden within the academy, to be able to begin to decipher this puzzle. Once she does, she will be able to sketch out an unusual pattern of lines and boxes into her Notebook. (The Slide locations are:

Later on, Silvia will find a Control Room. (The Control Room is the first door encountered when first arriving in the Back Alley (the top left room of the area). This door formerly had an electronic lock that was released, once Silvia used the Fuses to power up the Electronic Room nearby in the Alley.) Inside this room, there will be a machine that has its wires cut, thus making its panel inactive. Can you figure out the next steps? If not... To repair the machine, Silvia can use the Cable, that she recently acquired, to patch the cut wires. 
Now, the machine will reactivate and Silvia will be able to use its panel. The "CONTROLLO"'s set of buttons will look remarkably similar to the projection of symbols that Silvia recently drew into her Notebook. View Silvia's sketch and click all of the corresponding boxes with the square buttons on the panel. If done correctly, the jet of hot air that is blocking the entrance to the fenced-in room on the right side will turn off.  Silvia will now be able to go into the fenced room to the right and reach the shelf within to acquire the final Diary Page and the Ornamental Key. 
 |
The Legend Of Zelda
(NES)
LEAVE ONE ENEMY BEHIND
If Link finds himself in a screen full of enemies that he has to cross through multiple times, there is a way to make it more passable. Simply defeat all of them, except one. Now, every time Link returns, only one foe will be present.

The Legend Of Zelda
(NES)
WAY THROUGH LOST WOODS
The Lost Woods in The Legend Of Zelda can be a frustrating lesson to learn. With a combination of four directions that can be taken, multiplied by the number of screens you must cross, some become lost from their quest for days.
There are no compasses outside of the Underworld labyrinths, but who needs one when you can use these directions right here:

Lost Woods: Up, Left, Down, Left
A chiming tune will confirm the correct direction out of the Lost Woods.
The Legend Of Zelda
(NES)
WAY THROUGH LOST HILLS
The Lost Hills, like their southwestern counterparts, the Lost Woods, can throw Link off the path, but with our directions below, no hope is lost:

Lost Hills: Up, Up, Up, Up
A chiming tune will confirm the correct direction out of the Lost Hills.
Metal Gear
(NES)
MAZE SOLUTIONS
There are two mazes to be found in Metal Gear. No hints are given, as to how to find your way through them. And if you become lost within them, you will soon notice that the screens will loop endlessly. To successfully find the right path through the mazes, you must choose 1 of 6 correct directions, 4 screens in a row. Below you can see the solutions — to see an animation of the correct routes, hold your cursor over the maps below:
Lower Maze in Jungle: Left, Left, Upper Left, Left

Upper Maze in Jungle (after Desert): Lower Left, Lower Left, Up, Lower Left

A special tune will confirm your success, upon taking the proper path.
Metal Gear
(NES)
RESET TIMER AT GAME'S ENDING
When you escape the Final Level, have your character use the cigarettes and the time will be reset.

Ninja Gaiden
(NES)
RESTORING PHYSICAL STRENGTH
Losing energy from the swarming attacks of enemies in Ninja Gaiden may seem demoralizing, but in a few areas in the game, you can boost your morale and chances by filling and refilling up on Restoring Physical Strength potions. Check out the areas below where the Restoring Physical Strength potions can be repeatedly gotten:
5-2, Fourth Floor (Restoring Physical Strength):

6-2, Fifth Floor (Restoring Physical Strength):

6-3, Fourth Floor (Restoring Physical Strength):

Ninja Gaiden
(NES)
SAFE ZONE WHILE FIGHTING KELBEROSS
Jaquio's pet dog, Kelbeross, guards the path at Stage 4-4 that eventually leads the way to the Temple Of Darkness — a very similar parallel to Cerberus, the three-headed dog that guards Hades in Greek mythology. Two Kelbeross appear and bounce from the walls and floor, spitting forth deadly globules, making for a frantic battle with little room for dodging and/or mistakes.
However, there is a relatively safe space hidden within the room where Kelbeross rarely invade (Notice that they rarely invade, meaning that they don't always enter the space, but they can and might at times, so stay alert!). Standing within the left pillar — the one set aglow in white in the illustration below — provides the buffer zone for Ryu to stage his attack.


Super Mario Bros. 2
(NES)
SECRET SHORTCUTS
Warp Jars are the most ideal way to take large, safe strides over several Worlds at a time in Super Mario Bros. 2. Unfortunately, there are only a few of these to be found.
However, for those with some diligence, there are some Worlds that offer secret shortcuts that will slide Mario and his fellow Players past large sections and/or tough stretches. They are discussed below: (Special Note: Luigi is typically, the Player of choice, to use in these shortcuts because his high jumping ability makes him easiest to reach tall ledges.)
(World 1-1)
There are two options to use here, but they both result in the Player leaping to the high plateau to avoid the interior room.
Option 1: Time a Power Squat Jump from the back of Tweeter when it bounces on its highest hop.

Option 2: Use Luigi and Power Squat Jump from the red log that lies across the waterfall.

Either way, the end-goal is to reach the higher path, in order to skip past using the open door in the hillside.

(World 1-2)
To avoid having to find a Key and working your way through the locked door, Luigi comes in very handy here. Jump onto the Ninji pictured below, duck down to Power Squat Jump and leap up, when Ninji reaches the height of his jump. The plateau above cuts down on a lot of time.

(World 3-1)
This special shortcut exploits a quirky quality that Mushroom Blocks hold in this title, and could be performed by any one of the four Players with a lot of effort and luck. However, to more easily take advantage, Princess or Luigi would be the best choices.
Once your Player reaches the top of the vine pictured below, you will notice that there seems to be a large region of sky, dotted with clouds, to your immediate left. To your right, you will find a number of Mushroom Blocks and a Panser.

Now for a shocking surprise — if you toss a Mushroom Block onto any one of the small, oval clouds, the block will actually rest on top!

If you are using Mario or Toad, you can progress slowly and with care to the left until you are able to reach the secret shortcut door that lies at the screen's edge. If you are using Princess or Luigi, you can accelerate and levitate or jump across the bottomless sky with ease.


Now, enter the secret door and follow the arrows in the diagram below to reach the boss. Bomb through the first rocky wall and leap above the actual screen of play, running left to drop a surprise ambush on Birdo!


(World 3-2)
From the start, have your Player run all of the way right across the overground region, taking care to avoid Ostros and other obstacles along the way. Once your Player reaches the rocky wall, pick up a Bomb and blast your way through the rock covering found above the underground entrance. Work your way to the left until you encounter a ladder. Climb down it.
Using Luigi and his Power Squat Jump, you can bypass a tough tunnel of rocky walls and Bombs ahead.
Kneel down at the edge of the cliff pictured below and use the Power Squat Jump to leap above the rocky ceiling to your left.

Run across the top of the screen until you reach the left-most ladder - the fifth ladder over (See illustration below.). Go down that ladder.

Climb back up the same ladder. Enter the door to reach Birdo.


(World 4-3)
After riding across a large body of water on Birdo's egg near the beginning of this stage, your Player will encounter a door. If you are using Princess or Luigi, skip that door and simply accelerate and leap to the right. Your Player will land on another stretch of land at the second tower. Run past that first door and keep right to bypass most of the ice and spikes that are contained within the tall towers. Get the Crystal Ball and face Fryguy.


(World 6-3)
There are two options to use here, but they both result in the Player passing a tall, rocky wall that conceals a shortcut that shaves several minutes from your stay.
Option 1: Climb up the ladder at the start of the stage. Using Luigi, run to the right to lure a Pokey to follow you back to the tall wall. Jump on top of the Pokey, duck down for the Power Squat Jump and when you approach the wall, leap above the screen to land on top of it. Run left and drop down to take the door. (See illustration below.)

Option 2: Climb up the ladder at the start of the stage. Run left until you reach the quicksand that is in front of the tall wall. Continuously move left against the wall. As you sink lower into the quicksand, be sure to jump, so that your head never falls too low below the surface. If you perform the trick correctly, your Player will slowly trudge underneath the wall and through the sand, until you reach the other side. Hop out and take the door. (See illustration below.)

Carefully hop across the cloud platforms to your left and land down in the pyramid area. Enter the opening to fight Birdo, followed by main boss, Triclyde.

World 7-1:
The multilayered cloud platforms, crawling with Ninji, Shyguys and Snifits, makes for a tedious stretch of play. But, with Luigi and a well-timed Power Squat Jump from the back of Tweeter over the pillar, an easier escape to that elusive ladder on the other side will be your reward.


Wrath Of The Black Manta
(NES)
INFINITE LIFE REFILL
The Black Manta has to face a lot of hostile members of DRAT, as he tracks down Taro and rescues all of those missing children. It's not always easy to stay healthy and avoid injury.
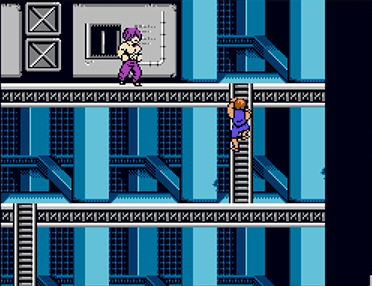
Anytime that the Black Manta reaches a room that is guarded by three enemies (like below ↓), he can quickly refill three blocks of life. This can be done repeatedly until his current strength tops out at eight blocks. See below (↓):

Enter a room that has the three enemy layout.

Quickly dodge and defeat the trio.

Once the enemies are defeated, Manta will gain three blocks of life (See the green highlighted blocks in the picture).

Simply exit and re-enter as much as needed to build up your full life!
Wrath Of The Black Manta
(NES)
THE ART OF INVISIBILITY
The Black Manta receives mastery of a set of new Ninpo Arts with each new city he completes investigating. The Art Of Invisibility is one of the more effective ones.
This art can be used as a semi-reliable form of "invincibility" that allows the Manta to, sometimes, pass through and fight some enemies.

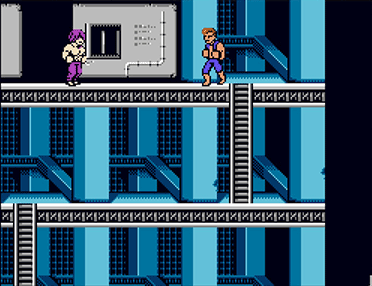
Also, it can be an easier way to engage with "the man in red" found throughout the various stages of the game.
Because of the unpredictable hit detection, Black Manta, oftentimes, may lose energy when he tries to move in to physically grab and speak to the red informant, but, if he uses the Art Of Invisibility first, the Black Manta's chances to safely question him may improve. (See above picture. ↑)
Wrath Of The Black Manta
(NES)
CHOOSE WHICH ENEMY BOSS YOU WANT TO FIGHT
BEFORE THE FINAL BOSS
On "Part 5 - DRAT Headquarters" immediately before you encounter the final boss, you have to choose one of four doors. Each door conceals a major boss you defeated earlier in the game. Use the image below to pick the main enemy you are most comfortable with battling:

INVINCIBILITY
 Shovel Knight
|
| TVSVUEIO |
ULTIMATE INVINCIBILITY (NEAR GAME'S END)Begin game with invincibility against everything, including spikes and pits [NOTE: With exception of being crushed on screen]; you pass through enemies and projectiles; with all 10 Health Meters, 100 Magic Level, 10,000 Gold; all Armor, Shovel Blade Upgrades and Relics; all Order Of No Quarter stages clear (except for some random encounters, bonus areas and Tower Of Fate); double-sized Shovel Knight with rapid-fire shoveling and unlimited, rapid-fire usage of Relics (costs no Magic!); super-fast Shovel Knight with moon jump ability and ability to pogo off of any surface; Armor changes color upon each jump and screen change; permanent Ichor of Fortune (attracts all treasure to Shovel Knight) |
| STQQTXVX | ULTIMATE INVINCIBILITY (NEAR GAME'S BEGINNING)Begin game with invincibility against everything, including spikes and pits [NOTE: With exception of being crushed on screen]; you pass through enemies and projectiles; with 4 Health Meters, 30 Magic Level, 0 Gold; all Relics, except both Chalices; rapid-fire shoveling and unlimited, rapid-fire usage of Relics (costs no Magic!); super-fast Shovel Knight with moon jump ability; permanent Ichor of Fortune (attracts all treasure to Shovel Knight) |
| EOYALQJU | INVINCIBILITY AND ABILITY TO PASS THROUGH ENEMIESBegin game with ability to pass through enemies and projectiles, however, you can die upon falling into pits and spikes |
| AFOFHFMJ | INVINCIBILITY AGAINST ALL ENEMIESBegin game with ability to not lose energy upon contact with enemies, however, bounce-back still occurs and you still can die upon falling into pits and spikes; also, all treasure is attracted to you permanently |
| OXLKJCGV | IMPENETRABLE BY SPIKESBegin game with ability to walk on spikes |
| XZZCJNNP | IMMUNITY FROM PITSBegin game with ability to not die upon falling into pits |
STRATEGIES
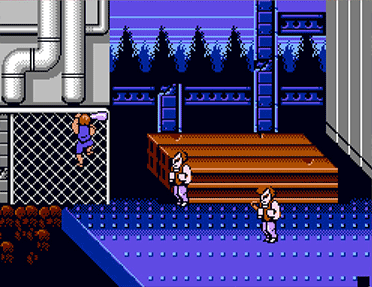
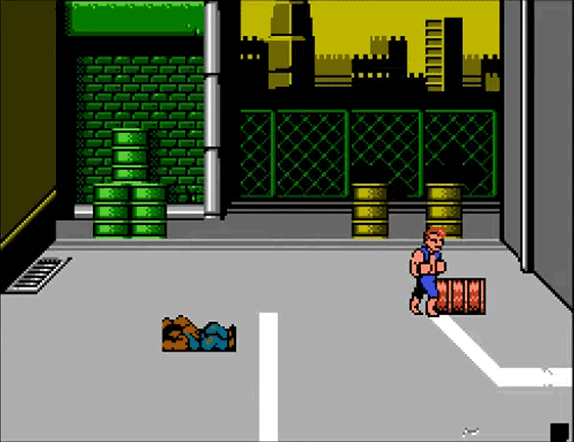
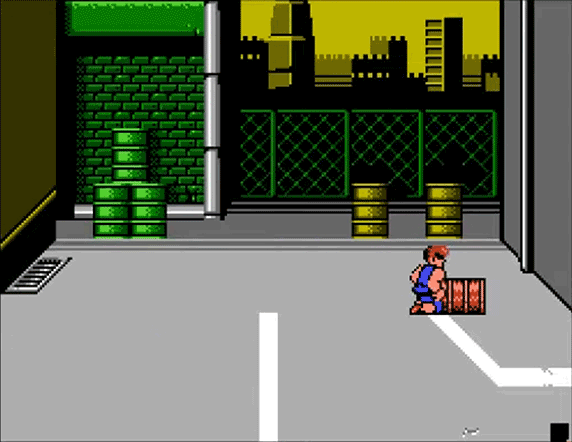
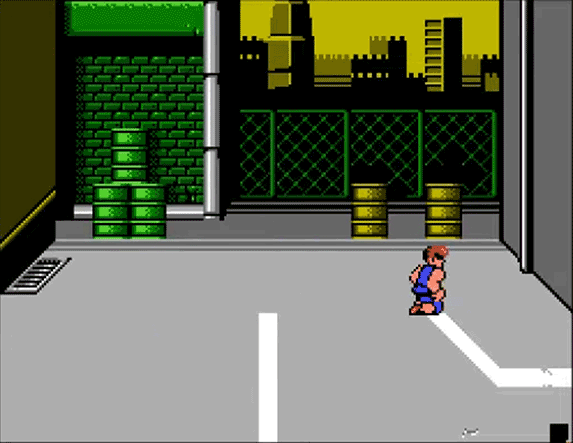
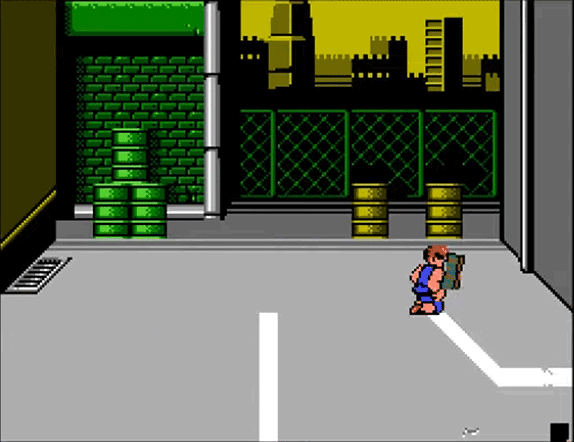
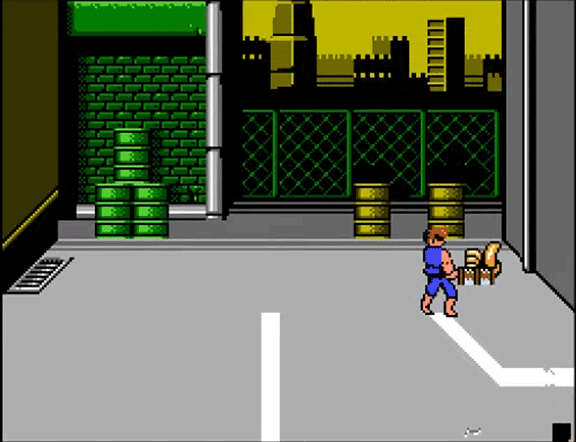
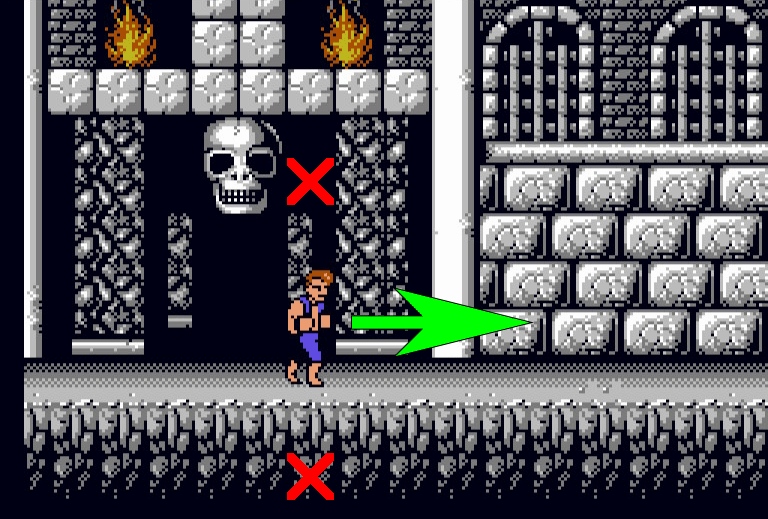
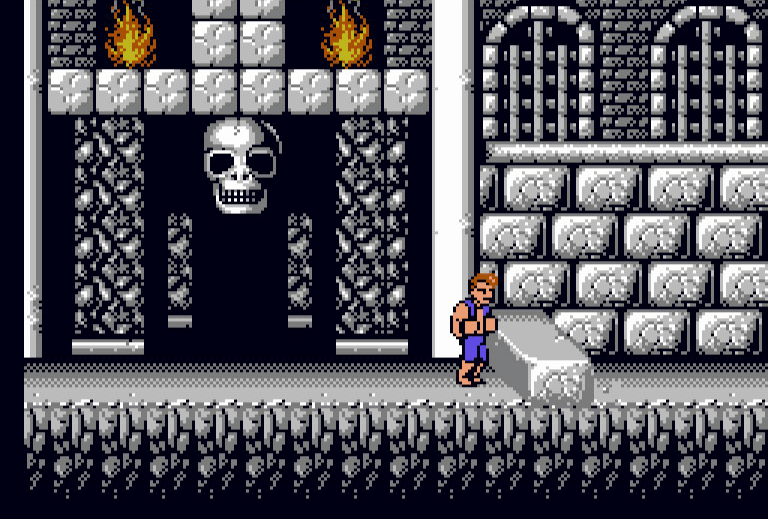
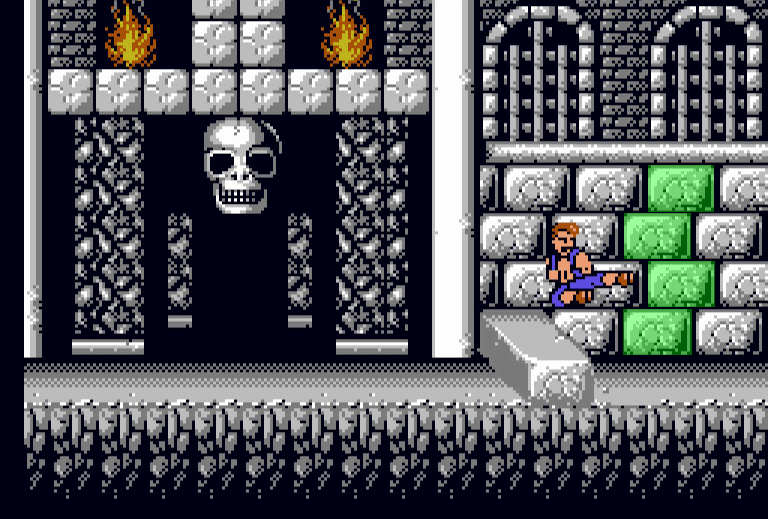
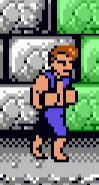
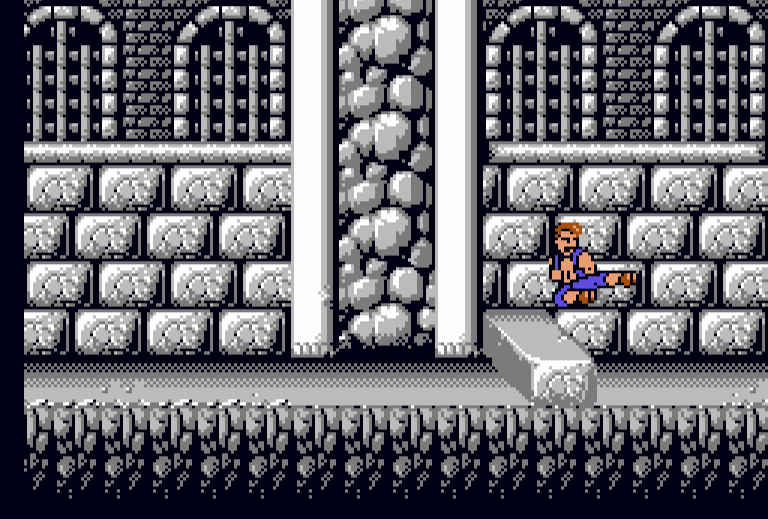
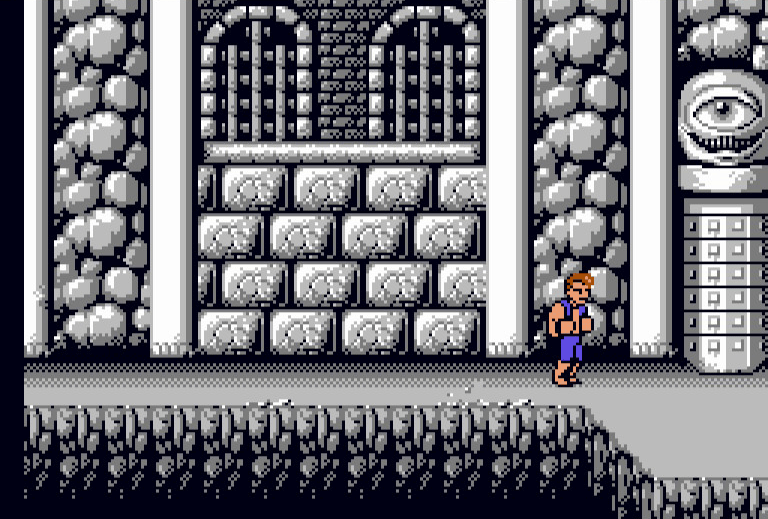
 Double Dragon (NES)SAFE WAY TO FIGHT WILLYAt game's end, Willy steps out with machine gun firing. Billy Lee will succumb to only a few hits from its bullets. Willy can attack from far away, using a barrage of shots, and in up-close combat, he will However—immediately when Willy comes out of the door—if Billy Lee can move down to the edge of the battle arena, where the the larger, brick, block pattern meets the red carpeting (see below (↓)), he will be in a safe area. Willy will be in a position to where his machine gun shots will be out-of-alignment with our twin hero! As long as Billy Lee does not move up, he will be able to safely attack Willy—even under fire. (However, note that moving in too closely can trigger Willy to use his pistol-whip maneuver. Finally, be sure not to go down too far or Billy Lee will fall into the spikes and lose a life.) 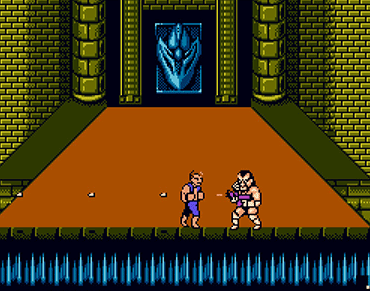

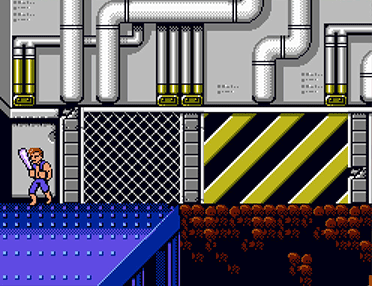
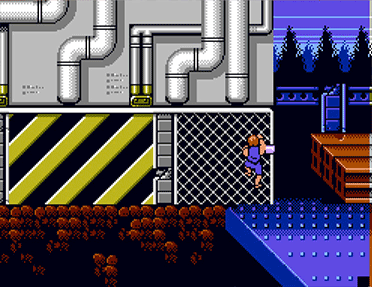
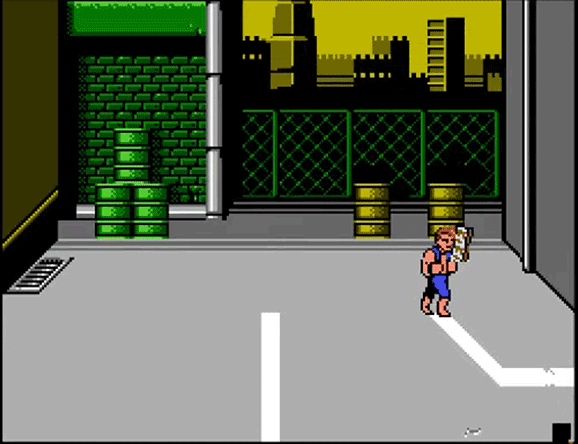
This is a closeup shot to show where to position Billy for the safe area, just out of the line of fire. One, final note: Billy can actually be positioned a few pixels above the spot shown above and still be safe. |
Wrath Of The Black MantaTo see the revelation of the main enemy and to learn the best strategy to beat the game, click here. |
PASSWORD SYSTEMS
 Castlevania II: Simon's Quest
|
Metal Gear
|
PROGRAMMERS'
TRICKS
 Ghosts 'N Goblins
|
The Legend Of Zelda
|


SECRET AREAS
 Castlevania:
|


SOUND TESTS
Ninja Gaiden
|


SPECIAL PASSWORDS
Castlevania II: Simon's Quest
|


|
 Begin a new game with Flame Whip (most powerful) |
 NOTE: Both "0"'s are ZEROES. |
 Begin a new game with Player Level 6 (max level) and Flame Whip (most powerful) |
 |
 Begin a new game with:
|
 NOTE: "O" is the LETTER "O", not a zero. |
 Begin a new game with:
|
Castlevania II: Simon's Quest
(NES)
UNUSUAL PASSWORDS
The following passwords are a curious mix of mostly English words that generate playable codes with some very random combinations of items, weapons and levels.
 |
 Start a game with 4 Days of Time Elapsed:
|
 NOTE: The "O"'s are the letter "O", not zeroes. |
 Start a game with 18 Days of Time Elapsed:
|
 |
 Start a game with 93 Days of Time Elapsed:
|
 NOTE: The "O"s are the LETTER "O", not zeroes. |
 Start a game with 35 Days of Time Elapsed:
|
Metal Gear
(NES)
|
"F-word"K YOUUU OKKKK JUANN CARLO: |
|
|
TOOOU TOOOU TOOOU TOOOU TOOOU: |
|
|
"F-word"M E1111 11111 11111 11111: |
|
|
"F-word"Y OOOOO OOOOO DUCKY OOOOO: |
|
|
T1111 11611 11111 11111 11116: |
|
|
ELLEN DIANE JENNI FERBI GBOSS: |
|
|
DIANE JENNY SOLID SNAKE 12345: |
|
|
3LLLL LLLLL LLLLL LLLLL LLLLL: |
|
|
51111 11111 11111 11111 1111F: |
|
|
21111 1Z111 11111 11111 111BI: |
|
|
51222 22222 22222 22222 22222: |
|
|
WZZZZ YZZZZ UOOOU UYRZZ VZZZK: |
|
|
5ZZZZ YZZZZ UOOOU UYRZZ VZZZS: |
|
|
GMMMM MMMMM MMMMM MMMMM MMMMM: |
|
Shovel Knight
(WII U)
In order to input the following codes, you need to select START GAME from the title screen,

then on the -PROFILE SELECT- screen, choose one of the open 9 slots to create a -NEW ADVENTURE-

and input one of the cheat codes found below.

Once entered, the game will display the following screen:

When you select YES, the game will prompt you to re-register your name. Do so and then, choose the new PROFILE and begin.

(NOTE: Using these passwords will disable the FEATS that you can normally attain in regular gameplay. Also, some of these codes can be used with Plague Knight in Plague Of Shadows, where applicable.)
| WSWWAEAW orX&BUTT |
BUTT MODEInstances of specific words, like SHOVEL and KNIGHT, will be replaced with the word "BUTT" in the game's dialogue |
| ALTFMMOW | INVISIBILITYBegin game invisible |
| LBSHEAOQ | ALL LIFE METERSBegin game with all 10 Life Meters |
| GVLEHQQF | ALL MAGIC METERSBegin game with 100 Magic Meter points |
| URPULDVW | INFINITE RELIC USAGE ONCE OBTAINEDBegin game and gain the ability to use Relics with unlimited use upon collection of them |
| SFZHLNLG | ALL BOSSES DEFEATED IN ONE HITBegin game and every boss encounter will result in boss only having a half a meter of health (one hit defeats him) |
| QWXELSUK | ALL BOSSES WEAKENED TO HALF LIFEBegin game and every boss encounter will result in boss only having half health |
| KYRNMAPC | AT BOSS ENCOUNTERS, ONE HIT WILL DEFEAT SHOVEL KNIGHT OR BOSSBegin game and every boss encounter will result in both opponents only having half a meter of health to battle with (only one hit will defeat Shovel Knight or the boss) |
| GGWBUCFV | START NEW GAME WITH NEARLY EVERYTHINGBegin game with everything unlocked (except for Music Sheets) |
| FVDNOSYB | START NEW GAME WITH MOST RELICSBegin game with most Relics (Flare Wand, Phase Locket, Dust Knuckles, Throwing Anchor, Alchemy Coin, Mobile Gear, War Horn, Propeller Dagger). Still need to get Fishing Rod, Chaos Sphere and both Chalices. |
| BXFGUEKM | START NEW GAME WITH ALL ARMORBegin game with all Armor unlocked |
| EJBHZACP | START NEW GAME WITH ALL SHOVEL BLADE UPGRADESBegin game with all Shovel Blade upgrades unlocked |
| KZXIVKAE | START NEW GAME WITH ALL MUSIC SHEETSBegin game with all 46 Music Sheets in inventory |
| ZNSKNTGG | START NEW GAME WITH 99,999 GOLDBegin game with maximum 99,999 Gold |
| ENTSSYSQ or RQQYUKIJ |
START NEW GAME PLUS WITH NOTHINGBegin with option to start a New Game Plus with nothing |
| BJLHZXED or STGZURSC |
START NEW GAME PLUS WITH NEARLY EVERYTHINGBegin with option to start a New Game Plus with everything unlocked and upgraded (except for Music Sheets) |
| AEVYCUNL or J&2JMP! |
POWER-UP: SUPER JUMPBegin game with Super Jump Mode |
| NBCZEDMJ or J&!JSMP |
POWER-UP: MOON JUMPBegin game with Moon Jump Mode |
| FCCKJOIQ | POWER-UP: ALMOST-UNLIMITED POGO BOUNCEBegin game with ability to pogo bounce off enemies and most surfaces (but, not spikes) |
| PIJMFJUG | POWER-UP: FAST SPEEDBegin game with fast movement speed |
| CRGYGUKP | POWER-UP: SUPER-FAST SPEEDBegin game with super-fast movement speed |
| PGPHIJJH | POWER-UP: FAST SHOVEL ATTACKBegin game with fast attack speed |
| QHGOILFF | POWER-UP: SUPER-FAST SHOVEL ATTACKBegin game with super-fast attack speed |
| TRGSVPPW | POWER-UP: SUPER SIZE (4×)Begin game with Shovel Knight being 4× his normal size |
| DSHHKILX | POWER-UP: INFINITE, AUTOMATIC ICHOR OF FORTUNEBegin game with all treasure being attracted to you |
| AZUIAOPF | STRANGE CODE: BUBBLES AND FLOAT EFFECTSBegin game with Alchemy Coin, Throwing Anchor and Trench Blade unlocked. Air bubbles fly from Shovel Knight when he is hit by enemies, and all treasure floats in bubbles. |
| TURJBNDR | STRANGE CODE: TREASURE BOUNCEAll treasure bounces |
| VEGSZMPI or IM&SGC14 |
STRANGE CODE: DEMO MODEBegin at first checkpoint of Lost City with all Relics and both Chalices, 6 health bars, Dynamo Armor, Trench Blade and 3 minute time limit to complete stage. Progress cannot be saved, however. |
| QXIEJJWS | STRANGE CODE: NO CLOUDSNo clouds on the World Map |
| SWJSROSY | STRANGE CODE: NO ADDITIONAL WORLD MAP ENCOUNTERSNo World Map encounters from roving knights, Black Knight or Wandering Travellers |
| TLZYAPLO | STRANGE CODE: ARMOR COLOR CHANGE WITH EACH HITBegin game with ability of armor changing color with each hit/collision with enemies |
| PCNIDOFR | STRANGE CODE: ARMOR COLOR CHANGE WITH EACH JUMPBegin game with ability of armor changing color with each jump |
| VBFDBFFG | STRANGE CODE: ARMOR COLOR CHANGE WITH EACH HIT OR JUMPBegin game with ability of armor changing color with each jump and/or each hit/collision with enemies |
| TZIJJYAG | HARD DIFFICULTY LEVEL: NO CHECKPOINTSNo checkpoints |
| XJRZZWAK | HARDEST DIFFICULTY LEVEL: ONE HIT KILLSDeath on hit, and no checkpoints |
STAGE SELECT
Ghosts 'N Goblins
|

WARPS
The Legend Of Zelda
|
Super Mario Bros. 2
|


WINNING PASSWORDS
Castlevania II: Simon's Quest
|
 |
WORST ENDING (15 days or more of Time Elapsed) |
 NOTE: "0" is the NUMBER "0", not the letter "O". |
NORMAL ENDING (8 days through 14 days, 23 hours and 59 minutes of Time Elapsed) |
 NOTE: The first "O" is the letter "O"; the second "0" is the number zero. |
BEST ENDING (0 days through 7 days, 23 hours and 59 minutes of Time Elapsed) |

 Firefox
 Chrome
 Internet Explorer
 Opera
Opera Safari


